How to make your own Easter egg
Do something different for Easter this year! Here's how to make your very own Easter egg from chocolate, a balloon, and a little bit more chocolate.
I was challenged to make my own Easter egg, with the stipulation that to use a mould would count as cheating. But I already know how to do such a thing… what's more, my way is easier and involves far less washing up. And it’s great fun, as long as you don’t mind getting messy (or making a couple of mistakes along the way).
What you need for one egg
1 x balloon, blown up to a small size
400-500g chocolate of choice (I went for organic white chocolate from Green & Black’s, because chocolate which doesn't contain vegetable fat works the best)
200g decorating chocolate of choice (sticking with Green & Black’s, I chose their espresso dark chocolate for intensity of flavour)
The biggest heatproof bowl you have
Microwave or bain-marie
Roasting tray lined with greaseproof paper
Ladle
Step 1 – melting the chocolate
Easy peasy. Chop your chocolate into small chunks and throw them all into the bowl. Either melt it in the microwave (on a low power setting, checking it every 30 seconds); or suspend the bowl over a pan of simmering water, bain-marie style, taking care not to let the bowl touch the water (it should be the steam that melts the chocolate) and stirring the chocolate at intervals until smooth.
Step 2 – letting the chocolate cool
Very important, or else your balloon will go pop! Leave the chocolate be for 20 minutes or so – it needs to be at room temperature before you use it. The perfect way to test that is to dab a little on your lip. If it doesn’t feel hot, then you’re good to go.
Step 3 – dunking the balloon
Holding the balloon by the knotted end, dunk it into the chocolate and coat the whole thing, leaving only the knot uncovered. One way to get a smooth finish is to hold the balloon up over the bowl, then pour the chocolate over it using a ladel (see the video). But it doesn’t really matter what this base layer of chocolate looks like, so don’t worry too much about it.
Step 4 – refrigerating the balloon
Place your balloon on a roasting tray lined with greaseproof paper, trying to keep as little of the balloon touching the paper as possible. Refigerate for 20 minutes – the chocolate surface should be solid, and it shouldn’t be shiny. Using a sharp knife, carefully trim off the excess chocolate and… eat it!
Step 5 – repeat
Time to dunk the balloon again – there should be enough chocolate left in the bowl for one more coating. This is what the outside of the egg will look like, so try and keep it smooth by using the ladle mehod. Or opt for a ‘rustic’ option and ‘pat’ the chocolate onto the balloon to give it a swirly, peaked effect.
You need to save about five tablespoons of melted chocolate for the next stage, so bear that in mind when you’re dunking. Pop the coated balloon back on to the roasting tray, bottom side down, and refrigerate for 30 minutes.
Step 6 – pop!
Take the egg out of the fridge (it should be set) and carefully trim off the excess chocolate. Then hold the balloon by the knotted end and, using a knife or scissors, pierce the balloon near the nozzle. It will make a ‘frrrrrrrrrrt’ sound, and then (should) come out whole. Of course, this worked perfectly for me when I was practising by myself, but as soon as the camera came out, everything went wrong... don't panic though; if the balloon falls into the egg, like it did for me, just use some tongs to fish it out.
Pop the egg back into the fridge whilst you crack on with step 7.
At this stage, you could also drop some chocolates or sweeties into your hollow egg through the hole at the top, so that whoever you give it to gets a surprise when they crack it open.
Step 7 – the chocolate disc
You can patch up the hole at the top of your egg with a chocolate disc, made from the leftover chocolate. If your chocolate has solidified, melt it again in the microwave – it shouldn't take much longer than 30 seconds.
Spoon some chocolate onto a piece of greaseproof paper, and smooth it out into a circular shape a little bit bigger than the hole the balloon left, and about 0.5cm thick. Pop it into the freezer for two minutes, or the fridge for five, until it’s set but still bendy.
Cover the hole with your bendy disc then, using the remaining melted chocolate as ‘concrete’, seal the edges with your finger and smooth over any rough patches. Put the egg back in the fridge for at least an hour to set it all nicely.
Step 8 – prepare to decorate
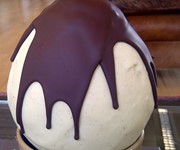
Of course you can leave the egg as it is, but it’s always nice to add a little extra something. You could paint on polka dots or stripes using melted chocolate, or maybe stick on chocolate buttons or sweets… my favourite thing to do is dribble melted dark chocolate over the top, to create a kind of volcano effect.
To do it my way, melt 200g of dark chocolate using the same method as before and allow it to cool to room temperature (I put mine in the fridge to speed up the process) – if the chocolate is too warm, it will melt your egg when you put it on top. When it's ready, pour the dark chocolate over the top of the egg slowly, so that it runs down the sides in drips. Stick the egg straight into the fridge to firm up.
Step 9 – eat
 Leave the egg in the fridge for at least an hour or two before serving. When you crack it open, it will be beautifully smooth inside, without any traces of balloon! Why not make mini balloon Easter eggs for friends and family this Easter? Just follow the same steps, but don’t blow the balloon up so much.
Liked that? Try these:
Comments
Be the first to comment
Do you want to comment on this article? You need to be signed in for this feature