How to knead bread

Getting the kneading right is a critical part of baking great bread. We've checked with the country's top bakers to find out the best way to do it.
 To begin
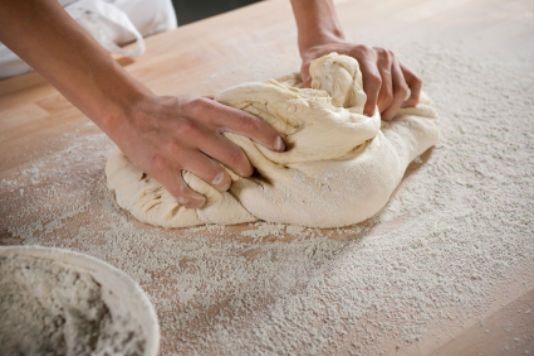
You need to lightly flour your work surface before you turn out your dough and start kneading.
What not to do
Don’t let the dough become too firm by coating it in too much flour, either from your hands or from the work surface. You need it to have some elasticity when you bake it. Some dough might stick to your hands at first, but don't worry about it.
Hand or dough hook?
You can use a dough hook attached to a mixer, but most people prefer the old-fashioned method of doing it by hand. Some use the hook for the early stages of kneading and then shape it by hand prior to baking.
Flour or oil?
Paul Hollywood uses oil instead of flour when he kneads, as he says it keeps the surface of the dough consistent.
Get kneading
Now comes the fun part! When you’re kneading, you want to develop the gluten by stretching the dough out to give your bread a fluffy texture. Delia Smith recommends pushing the dough out with the heel of one hand while pulling it back with the other. Lesley Waters demonstrates a variety of techniques (including one we're christening 'the slam') in this BBC Food video.
This video shows a slightly different method, using one hand to hold the dough while the other stretches it and folds it back.
Whatever method you prefer, keep turning the bread and get into a rhythm.
When the dough starts to spring back and looks shiny, then you know you’re nearly there. The general consensus is that kneading should take around five to ten minutes.
Second time around
- Once you’ve done the initial kneading, put the dough in a mixing bowl and cover it with a tea towel or some lightly oiled clingfilm.
- Leave it for around an hour at room temperature until the yeast has kicked in and the dough has doubled in size.
- You then need to give it a punch to knock the air out and give it a further knead on a floured surface. Then you’re ready to shape it as you like, and leave it to expand again before baking.
Last-minute tip
To check that your dough is ready to be shaped, give it a prod. If the dough springs back, you’re good to go. If the dent stays, give the dough a bit more time then check again.
Tell us your tips
Which method do you prefer? Have you got any other tips to share? Let us know in the Comments section below.
Practice your baking with our top 10 bread recipes
More baking how to guides
Comments
Be the first to comment
Do you want to comment on this article? You need to be signed in for this feature