Piñata cake recipe
Piñatas aren’t just for bashing, they’re for eating too. Here lovefood’s Charlotte Morgan shows us how to make a cake that spills sweeties with the first slice.
Six sponges
First off, you need six circular sponges. So three normal cakes, each split in two. It’s very simple – just make a huge standard sponge mix (600g sugar, 600g butter, 600g self-raising flour, 12 eggs) and then, to give it a coconutty flavour, swirl through some desiccated coconut that’s been marinating in coconut milk (see below for full recipe).
Note: if you don't have a massive food processor like we do, it might be easier to make three separate 200g cake mixes, then combine them all together.
Divide the mix between three 20cm-round cake tins, and cook at a low heat (160C) for 45 minutes or so, until a skewer inserted into the centre of the cakes comes out clean. Allow them all to cool, while you enjoy a well-earned brew.
Splitting and stamping
 This is probably the trickiest part of the recipe. You need to level off the cakes (eat the golden tops), and slice each one horizontally in two, so you have two cakes for each of your three bakes, giving a total of six. I used a sharp bread knife to do this; be warned that if your knife is blunt it will never make a neat cut.
Next, in all but two of your six cake layers, you need to stamp a 7.5cm circular hole into the centre of the cake. I used a cookie cutter for this, and fed my colleagues the leftover cake circles it made. The two untampered-with sponges will form the base and top of your piñata cake.
Syrup and stacking
 Make a quick syrup from equal measures of caster sugar and water. This will add moisture to your cake. Also make a large batch of buttercream – I usually use one part butter to two parts icing sugar for this, but the recipe I was following suggests something different (see below). It’s up to you.
Place your base sponge (choose the flattest one of the two without a hole) onto a serving plate and dab the top in syrup, before spreading with a thin layer of buttercream. Repeat this process (syrup + buttercream), using your four holey cakes, to make a stack. You should be left with just one cake layer, which will form the top of your masterpiece.
Sweeties!
 Now comes the fun part. Fill the hole you’ve created with sweeties of your choice – I went for Jelly Babies, but upon reflection something harder and smaller would have worked better (the Jelly Babies were too chunky to gush out of the cake, instead they fell out clumsily).
Fill it right to the top, before sealing your cake with the final sponge layer. You’ll be left with a towering cake that, unbeknown to everyone but you, contains a stash of secret sweeties.
Buttercream fingers
 You need to cover the entire cake in buttercream now. It needs an initial ‘crumb coat’ (pictured left), which a) traps crumbs so they don’t escape, b) seals the layers, and c) provides a foundation for decoration. It’s basically just a rough, very thin coating of buttercream, so don’t spend any time making it look pretty. Refrigerate for 30 minutes.
 Take the cake out of the fridge, and with a clean spatula or knife, cover the cake in buttercream – and this time, as neatly as you can. Once that’s done, sprinkle it with desiccated coconut (press it into the sides of the cake), or whatever decoration you fancy. A colurful array of Smarties could work?
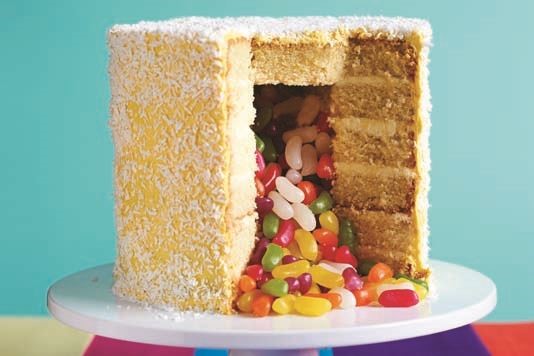
The result
 When you cut into your piñata cake, it will spill sweeties everywhere! It’s a great party number, and tastes fantastic too (it lasted all of 45 minutes in our office). Just leave a good three hours for this project, as it does take time to assemble everything carefully.
Do you fancy making a piñata cake? Do let us know how it goes in the Comments box below – happy baking!
Ingredients
- 200 g caster sugar
- 200 g unsalted butter, softened
- 4 large eggs
- 200 g self-raising flour
- 7.1 oz caster sugar
- 7.1 oz unsalted butter, softened
- 4 large eggs
- 7.1 oz self-raising flour
- 7.1 oz caster sugar
- 7.1 oz unsalted butter, softened
- 4 large eggs
- 7.1 oz self-raising flour
- 500 g unsalted butter, softened
- 500 g icing sugar, sieved
- 2 –4 tbsp. double cream
- 150 ml coconut cream
- 17.6 oz unsalted butter, softened
- 17.6 oz icing sugar, sieved
- 2 –4 tbsp. double cream
- 5.3 fl oz coconut cream
- 17.6 oz unsalted butter, softened
- 17.6 oz icing sugar, sieved
- 2 –4 tbsp. double cream
- 0.6 cup coconut cream
- 100 g caster sugar
- 100 ml water
- 3.5 oz caster sugar
- 3.5 fl oz water
- 3.5 oz caster sugar
- 0.4 cup water
- 6 tbsp desiccated coconut
- 250 ml coconut milk
- 6 tbsp desiccated coconut
- 8.8 fl oz coconut milk
- 6 tbsp desiccated coconut
- 1.1 cups coconut milk
- 150 g coconut flakes or desiccated coconut
- 5.3 oz coconut flakes or desiccated coconut
- 5.3 oz coconut flakes or desiccated coconut
- 100 g sweets or sprinkles
- 3.5 oz sweets or sprinkles
- 3.5 oz sweets or sprinkles
Details
- Cuisine: English
- Recipe Type: Cake
- Difficulty: Medium
- Preparation Time: 90 mins
- Cooking Time: 50 mins
- Serves: 12
Step-by-step
- Preheat the oven to 160ºC (325ºF). Grease three 20cm (8-in) round cake tins and line them with parchment paper. Alternatively, spray the tins with cake-release spray.
- For the marinated coconut: Place the desiccated coconut and coconut milk into a small saucepan set over a medium heat until barely simmering. Take the saucepan off the heat and allow the mixture to cool.
- For ONE sponge cake (you need to do this three times): In the large bowl of an electric stand mixer, beat together the sugar and butter until very pale and fluffy.
- In a mixing bowl, lightly beat the eggs. Slowly add the beaten eggs to the sugar and butter mixture with the stand mixer running on a medium speed.
- Once combined, add the flour and mix at low speed until just combined.
- Repeat steps 3-4 as if you were making three cakes in total. Then combine ALL of the batter you've made in one big bowl. Mix the cooled marinated coconut into the cake batter and divide the mixture between the three prepared tins.
- Bake for 45–50 minutes. You will know that the sponge cake is cooked when the sides are coming away from the tin and a cocktail stick inserted into the centre of the cake comes out clean.
- Allow the cake to cool in the tin for 20 minutes, then transfer to a cooling rack to cool completely.
- For the buttercream: In the large bowl of an electric stand mixer, beat the butter until it is pale. Add half of the sugar and mix it into the butter while the mixer is running on a slow speed. Once combined, add the remaining sugar. Beat the coconut cream into the buttercream until smooth.
- Increase the mixer speed to high and beat the mixture for approximately 5 minutes until it is very light and fluffy.
- Reduce the speed of the mixer to medium and add the double cream a little at a time until you achieve a smooth, spreadable consistency.
- For the simple syrup: Place the sugar and water in a saucepan and bring to the boil. Remove the saucepan from the heat once the sugar has dissolved and the liquid has boiled for 1–2 minutes. Leave to cool.
- To assemble the cake: Level off the tops of the three cooled cake layers using a large serrated knife or cake leveller. Cut each layer in half horizontally to create six layers.
- Using the round pastry cutter, cut out a hole from the centre of all but two layers. To do this, first cut a single layer, then place it on top of an uncut layer and align the layers. Push the cutter through the hole in the top layer to cut the bottom one so that the hole in the bottom layer is in the same position as it is in the top layer. Do this twice more so you have four cut layers.
- Brush the sponges with syrup. Place one of the uncut layers onto a cake board or a cake stand and apply an even layer of buttercream over it. Next, carefully place a layer with a hole on top and apply an even layer of buttercream onto the top of that layer. Make sure you don’t get any buttercream inside the ring in the middle.
- Repeat step with the remaining ring layers. Be very careful when you move the layers around as they will be weakened by the hole in the middle.
- Pour your chosen sweets into the hole in the centre of the cake. Now apply another even layer of buttercream and place the final uncut layer on top to seal everything in.
- Once assembled, crumb coat the cake. Chill in the fridge for 30 minutes, then apply the final, thicker layer of buttercream to the cake.
- Now, decorate your cake with a pretty layer of coconut flakes. You might want to toast the flakes first. If you would like to, spread them out on a baking sheet and grill for 30 seconds or so. Keep an eye on the flakes so they don’t burn, which can happen very quickly. Allow to cool completely, then sprinkle the toasted or untoasted flakes of coconut over the frosting, and press them into the sides of the cake with your hands.
Recipe taken from ‘Cool Layer Cakes’ by Ceri Olofson.
You might also like:
Comments
Be the first to comment
Do you want to comment on this article? You need to be signed in for this feature