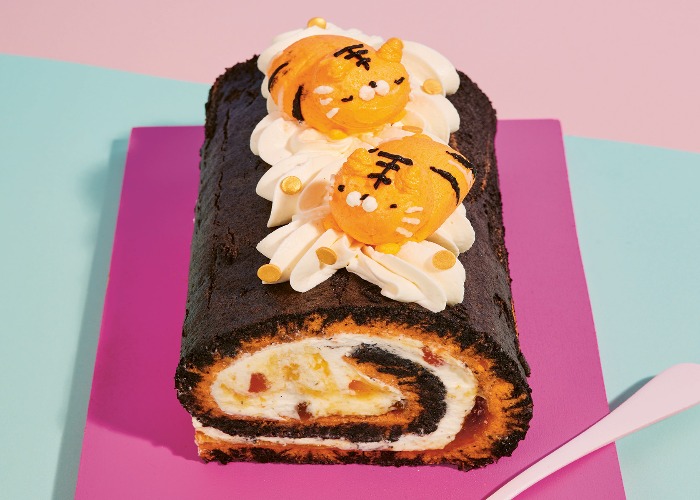
Kim-Joy's tiger-inspired Swiss roll recipe

A homemade Swiss roll is always impressive, so a tiger-themed Swiss roll is bound to turn more than a few heads. Perfect as a birthday cake for a cat lover (of any age) or as a centrepiece at a fun family party or afternoon tea, it requires a little effort to get it looking this cute, but it'll repay you in both looks and taste.
This wildly inventive cake is just one of many cute, cat-inspired recipes in Kim-Joy's latest cookbook, Bake Me a Cat. Naming it 'Eye of the tiger', the 2018 Great British Bake Off finalist has infused it with plenty of sweet, delicately floral flavours, so it matches up to its striking looks.
She says: “This cake roll is made using a chiffon cake technique, along with a special technique to swirl the colours, so it’s very different to a standard Swiss roll. It’s soft as a pillow, not to mention stripy and striking.
“To make sure the pattern comes out nicely and the cake rolls without a big crack, be sure to read and reread the recipe first before you start. But, if it does crack, don’t worry – your new-found tiger buddies will help conceal it.”
Things to note:
You'll need a 27 cm x 35 cm (11 in x 14 in) Swiss roll tin.
The cake can be made gluten-free, with alternative ingredients and measurements noted in the recipe.
You can decorate the roll with tigers made with piped buttercream, shaped fondant or decorated meringue or biscuit, or you can buy premade tiger figurines.
For US ingredients and measurements, use the drop-down menu and select 'Cups'.
Ingredients
- 1 tbsp unsweetened cocoa powder (ideally Dutch-processed black cocoa powder, as it’s darker in colour, although any will do)
- 2 tbsp hot water
- 1 drop of black food dye
- 1 drop of orange food dye
- 1 tbsp unsweetened cocoa powder (ideally Dutch-processed black cocoa powder, as it’s darker in colour, although any will do)
- 2 tbsp hot water
- 1 drop of black food dye
- 1 drop of orange food dye
- 1 tbsp unsweetened cocoa powder (ideally Dutch-processed black cocoa powder, as it’s darker in colour, although any will do)
- 2 tbsp hot water
- 1 drop of black food dye
- 1 drop of orange food dye
- 1 knob of butter, for greasing
- 5 medium egg yolks
- 2.5 tbsp caster sugar
- 1 pinch salt
- 60 ml vegetable oil
- 60 ml whole milk
- 2 tsp orange blossom water
- 100 g plain flour (to make gluten-free, substitute with a gluten-free plain flour blend plus ¼ tsp xanthan gum)
- 2 tsp cornflour
- 1 knob of butter, for greasing
- 5 medium egg yolks
- 2.5 tbsp caster sugar
- 1 pinch salt
- 2.1 fl oz vegetable oil
- 2.1 fl oz whole milk
- 2 tsp orange blossom water
- 3.5 oz plain flour (to make gluten-free, substitute with a gluten-free plain flour blend plus ¼ tsp xanthan gum)
- 2 tsp cornflour
- 1 knob of butter, for greasing
- 5 medium egg yolks
- 2.5 tbsp superfine sugar
- 1 pinch salt
- 0.3 cup vegetable oil
- 0.3 cup whole milk
- 2 tsp orange blossom water
- 3.5 oz all-purpose flour (to make gluten-free, substitute with a gluten-free flour blend plus ¼ tsp xanthan gum)
- 2 tsp cornstarch
- 5 medium egg whites
- 65 g caster sugar
- 5 medium egg whites
- 2.3 oz caster sugar
- 5 medium egg whites
- 2.3 oz superfine sugar
- 6 tbsp fine-cut marmalade (or your choice of jam)
- 300 ml double cream
- 30 g icing sugar
- 1 tbsp vanilla bean paste
- 6 tbsp fine-cut marmalade (or your choice of jam)
- 10.6 fl oz double cream
- 1.1 oz icing sugar
- 1 tbsp vanilla bean paste
- 6 tbsp fine-cut marmalade (or your choice of jam)
- 1.3 cups heavy cream
- 1.1 oz powdered sugar
- 1 tbsp vanilla bean paste
Details
- Cuisine: British
- Recipe Type: Baking
- Difficulty: Hard
- Preparation Time: 90 mins
- Cooking Time: 20 mins
- Serves: 8
Step-by-step
- Preheat the oven to 160°C/150°C fan/325°F/gas mark 3.
- Grease the base and sides of a 27 cm x 35 cm (11 in x 14 in) Swiss roll tin with butter and line with baking paper (wax paper) covering the base and extending beyond the two longer sides.
- First, for the cake colour, stir the cocoa powder and hot (but not boiling) water together in a bowl. Set aside.
- Add all the egg yolk mixture ingredients to a large bowl and whisk until smooth.
- In a separate bowl, make the egg white mixture. Use a handheld electric whisk or stand mixer fitted with the balloon whisk attachment to whisk the egg whites on medium speed until foamy. Add the caster (superfine) sugar and continue whisking until soft peaks form. For this cake, you want the peaks to flop over slightly at the tips, rather than point straight upwards. If you whisk beyond this point, you may get cracks in your finished cake when rolling.
- Fold the egg whites into the egg yolk mixture, a third at a time. Your finished batter should be of pourable consistency, but still fluffy and full of air from the egg whites. Pour 200g (7oz) into a separate bowl and stir in the cocoa powder mixture until combined. Add enough black food dye to colour it a deep black colour. Stir the orange food dye through the mixture in the first bowl. Be careful to fold gently and not any more than is necessary.
- Pour the orange batter into the prepared tin and spread out evenly. Pour the black batter on top and spread out to cover the orange batter completely (don’t worry too much about the edges as they will be sliced off later!). Spread it out gently with the back of a spoon, trying not to disturb the batter underneath. Use a chopstick or the handle of a spoon to swirl the batter: drag the chopstick or spoon left and right along the longest side, working your way from top to bottom, then repeat the same motion along the shortest side. Bang the tin against your work surface once to release any large air bubbles.
- Bake immediately for 20 minutes, or until the cake in the middle of the tin is spongy and springs back. Using the sides of the baking paper, lift the cake onto a wire rack and leave to cool.
- When the cake is cool, place a sheet of baking paper on top, then a chopping board (or any flat board) and flip the whole cake over. Peel off the layer of baking paper that the cake was baked on, then trim all the edges (they are drier, so leaving them could cause the cake to crack). On one of the shorter ends, cut 5 shallow slits into the cake, then spread over the marmalade. Add the cream, icing (powdered) sugar and vanilla to a bowl and whip to soft peaks. Spread two-thirds of the cream on top of the marmalade, adding a thicker amount of cream on the side with the slits. Roll the cake up from one of the shorter sides using the baking paper to help you. Don’t roll the cake too tightly, otherwise, it will crack.
- Place the roll on a serving tray and trim the ends off so that the spiral shows clearly. Decoratively pipe the remaining cream on top and nestle in your chosen tigers/cats.
Recipe adapted from Bake Me a Cat by Kim-Joy (Quadrille, £16.99). Photography: Ellis Parrinder.
You might also like:
Kim-Joy's cat-themed doughnuts recipe
Paul Hollywood's Sicilian lemon and orange sweet bread recipe
Comments
Be the first to comment
Do you want to comment on this article? You need to be signed in for this feature