Pistachio pie with raspberry meringue topping recipe

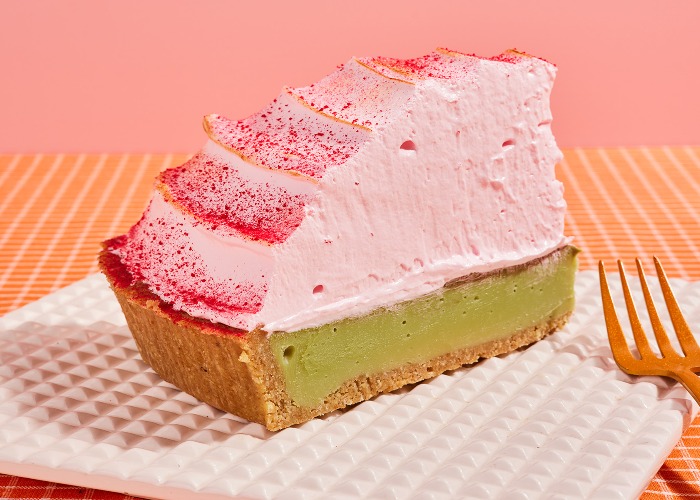
This pistachio pie is a fun, playful dessert that'll make your inner child rejoice (and run off to grab the nearest spoon). Officially named 'Mr Pistachio', it's the creation of Rich ‘Mr Sprinkles’ Myers, owner of Leeds-based bakery GET BAKED.
The bakery hit headlines after being caught up in legal drama involving sprinkles (an incident dubbed 'Spinklegate'), and drew more attention with its outrageously indulgent 24-layer chocolate cake, BRUCE (named after the world's most famous fictional chocolate cake lover Bruce Bogtrotter, from Roald Dahl's Matilda).
Now, Rich has come up with the goods again with this joyous pistachio pie, topped with pillowy meringue. He says: "When made properly, the texture of Italian meringue is like nothing else (apart from imaginary, cartoon-style clouds) and it carries additional flavours with such grace and decorum. In theory, it’s a super-simple recipe, but in actuality, it requires some skill, and in the wrong hands you’ll be stood there looking into a bowl of soupy mess."
He also recommends using a stand mixer, if you can, adding: "I wouldn’t attempt it without one, because your arm will probably fall off."
Please note: The pie filling will need time to set in the fridge.
For US ingredients and measurements, use the drop-down menu and select 'Cups'.
Ingredients
- 250 g shop-bought Belgian waffles
- 250 g oat biscuits
- 5 g sea salt
- 300 g unsalted butter, cubed
- 8.8 oz shop-bought Belgian waffles
- 8.8 oz oat biscuits
- 0.2 oz sea salt
- 10.6 oz unsalted butter, cubed
- 8.8 oz store-bought Belgian waffles
- 8.8 oz oat cookies
- 0.2 oz sea salt
- 10.6 oz unsalted butter, cubed
- 300 g double cream
- 500 g white chocolate, chopped up if in bar form
- 300 g pistachio crème
- 10.6 oz double cream
- 17.6 oz white chocolate, chopped up if in bar form
- 10.6 oz pistachio crème
- 10.6 oz heavy cream
- 17.6 oz white chocolate, chopped up if in bar form
- 10.6 oz pistachio crème
- 50 g freeze-dried raspberries, plus extra to decorate
- 475 g caster sugar
- 160 g cold water
- 260 g egg whites
- 1 tsp vanilla extract
- 1.8 oz freeze-dried raspberries, plus extra to decorate
- 16.8 oz caster sugar
- 5.6 oz cold water
- 9.2 oz egg whites
- 1 tsp vanilla extract
- 1.8 oz freeze-dried raspberries, plus extra to decorate
- 16.8 oz superfine sugar
- 5.6 oz cold water
- 9.2 oz egg whites
- 1 tsp vanilla extract
Details
- Cuisine: British
- Recipe Type: Baking
- Difficulty: Medium
- Preparation Time: 60 mins
- Cooking Time: 20 mins
- Serves: 10
Step-by-step
For the crust
- Preheat your oven to 180°C/160°C fan/350°F/gas mark 4.
- Blitz the Belgian waffles to a fine crumb in a food processor (or bash them with a rolling pin). Once you’ve pulverised them, bang the crumbs on a baking tray and toast in your oven for 15 minutes, or until they’ve browned slightly and your kitchen smells utterly sensational. While your waffles are in the oven, pulverise the oat biscuits and decant them into a mixing bowl.
- Add your toasted waffle crumb and sea salt to the bowl and give everything a mix.
- Melt your butter in the microwave in a heatproof, microwave-safe container until it’s totally melted (about 1 minute 30 seconds should do it). Add the melted butter to your bowl of crumbs and mix thoroughly using your hands, ensuring even distribution of melted butter. You don’t want any dry patches.
- Press the mixture into your 30 cm (12 in) pie tin straight away, while the mixture is still warm, making sure to line the sides as well as the base. If you leave it too long, the butter will set, and it’ll become much less pliable. If you like, you can make this in advance, and then just reheat the crumb in the microwave in short 15-second blasts.
- Once you’ve lined your tin, bang it in the fridge to firm up for 10 minutes. If you’re that way inclined, you can make your pie crusts in advance and freeze them. They’ll be good in the freezer for up to a month and won’t lose any quality whatsoever.
For the ganache
- Put the double (heavy) cream, white chocolate and pistachio crème in a heavy-bottomed saucepan and place over a very low heat, stirring continuously with a heatproof spatula. Be very careful not to overheat the mixture, because white chocolate splits notoriously easily. I’d recommend removing it from the heat every 30 seconds or so, so that it doesn’t get too hot. As you stir, pay extra-close attention to the bottom and sides of the pan.
- Remove the pan from the heat when you can still see a small amount of white chocolate pieces. If you continue to stir, the heat still inside the pan will melt the remaining chocolate without it getting too hot. When the ganache is smooth, pour it into the toasted waffle crust and put it into the fridge to chill.
For the raspberry meringue
- To do this, first blitz your freeze-dried raspberries in a food processor, or a pestle and mortar. You want them to resemble a very fine sand.
- Follow the Italian meringue recipe below. When the meringue is just about ready, pour in the raspberry dust and continue to whisk until the meringue turns pink and tastes all fruity. When the meringue is ready, dollop mounds of it all over your freshly chilled pistachio pie.
- Once the bowl is empty, and the pie is covered, place it on a cake turntable and, using a small offset palette knife, smooth out the meringue while turning the pie. Finish the pie by blitzing another small handful of freeze-dried raspberries and sprinkling them on top.
- To enjoy at its absolute best, serve the pie on the day it's made.
For the Italian meringue
- Put the caster (superfine) sugar and water in a heavy-bottomed saucepan and set to one side.
- Fat residue will stop your egg whites from properly aerating, so it’s crucial to ensure that both your stand mixer bowl and whisk are spotlessly clean. Egg yolk contains fat, so when you’re separating your eggs you need to be extra careful to make sure that you don’t get any yolk in your whites. If you do, you’re going to need to start again. Add the egg whites to the clean stand mixer bowl and attach the whisk attachment.
- Give the sugar and water a good stir, just enough to make sure that there’s no sugar stuck to the bottom of the pan, and place over a medium heat. Put a candy thermometer or temperature probe into the pan and, very importantly, don’t leave the pan unattended.
- Do not stir the mixture once you have put it onto the heat; just leave it to do its thing. When the sugar syrup reaches 115°C (240°F), turn your stand mixer onto the highest speed and begin whipping your egg whites. In the next couple of seconds your sugar is going to reach 120°C (250°F) and as soon as it does you need to remove the pan from the heat, turn the stand mixer down to low speed and slowly and steadily pour the sugar syrup into the egg whites.
- The trick is to make sure that your egg whites are just at the soft peak stage at the point you pour in your sugar syrup. This is where skill and experience come in – it’s like a juggling act between the eggs and the sugar. If the sugar takes longer than normal to reach 120°C (250°F) then you’ll overwhip your egg whites and your meringue will be foamy as opposed to fluffy. If your eggs are under-whipped when you add your sugar syrup, then they’ll never really whip enough and you won’t get to experience the sensational pillowy-cloudlike mouthfeel of a properly made Italian meringue.
- When pouring the sugar syrup, make sure that you pour it down the inside edge of the bowl and not directly onto the whisk, because the last thing you need is boiling sugar being flung around the kitchen.
- When you’ve poured all of the sugar syrup into the egg whites, turn the stand mixer to the highest speed. There’s nothing more to do at this point other than watch as it gets fluffy, glossy and delicious.
- After about 10 minutes of whipping, your stand mixer bowl will go from being hot to the touch to room temperature. When you can comfortably touch the bottom of the bowl, add your vanilla extract.
- Continue to whip for another minute, or until the vanilla is evenly distributed. You’ll know whether or not you’ve nailed the meringue when you taste it. If it’s out-of-this-world and so smooth that you can’t even feel it in your mouth, then congratulations!
- Your Italian meringue is ready to use straight away as a topping or just straight out of the bowl. Try it with some fresh, in-season strawberries and a glass of champagne.
- Italian meringue is best consumed on the day it’s made. If you’re not using it straight away, store it in the fridge in an airtight container and consume within 24 hours.
Recipe extracted from GET BAKED: Sensational cakes, bakes & desserts by Rich Myers. (RRP £14.99, hardback). Images © Ellis Parrinder. White Lion Publishing.
You might also like:
Comments
Be the first to comment
Do you want to comment on this article? You need to be signed in for this feature