The Queen's favourite chocolate biscuit cake recipe

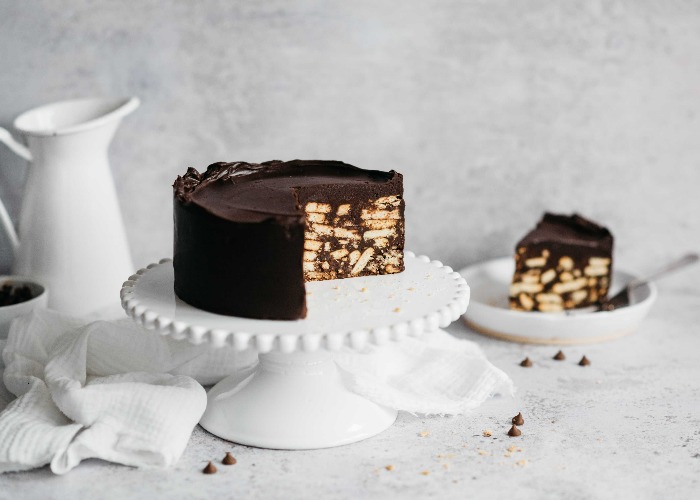
Did you know that chocolate biscuit cake is the Queen’s favourite cake? Apparently, she loves it! I agree with Her Majesty. As a kid, I always made my mum make me a chocolate biscuit cake for my birthdays. She called it "my Juliet’s chocolate loaf". It was her take on the Chocolate Juliette. She didn’t like baking, so this no-bake cake was the one I always got from her, and I loved it.
So, what else could I create than an extra special chocolate biscuit cake recipe for this once in a lifetime event? I’ve really enjoyed coming up with this extra special recipe for the Jubilee. Something that everyone can make at home.
It’s a very simple cake to make and extremely rich. You only need a small serving, so it is good for a small gathering and will keep in the fridge for up to five days. It’s also one you can make ahead of all your upcoming celebrations as it keeps well. So you can simply make a 15cm (6in) round cake for a smaller gathering, or for a real showstopper, increase the quantities to make a fantastic tiered cake. This recipe is for a 15cm (6in) round x 8cm (3in) depth cake tin, however, if you wish to make a larger 20cm (8in) round, double it, or to create a right royal showstopper, you can triple this amount, make two cakes and stack them to build a majestic two-tier biscuit cake centrepiece.
Styling notes – to add a little more pomp to the cake, piped ganache rosettes can be added to the top around the edge left plain or you can add silver leaf flecks to these and the outside. Alternatively decorate with little Union Jack flags or a Jubilee-inspired cake topper.
Ingredients
- 200 g dark chocolate chips, or finely chopped bar
- 100 g double (heavy) cream
- 50 g butter, melted
- 7.1 oz dark chocolate chips, or finely chopped bar
- 3.5 oz double (heavy) cream
- 1.8 oz butter, melted
- 7.1 oz dark chocolate chips, or finely chopped bar
- 3.5 oz double (heavy) cream
- 1.8 oz butter, melted
- 250 g Rich Tea biscuits
- 200 g good quality dark chocolate (around 70-72% cocoa solids)
- 150 g salted butter, softened
- 150 g caster sugar (we like Silver Spoon)
- 2 free-range eggs, medium
- 1 tsp vanilla bean paste or extract
- 8.8 oz Rich Tea biscuits
- 7.1 oz good quality dark chocolate (around 70-72% cocoa solids)
- 5.3 oz salted butter, softened
- 5.3 oz caster sugar (we like Silver Spoon)
- 2 free-range eggs, medium
- 1 tsp vanilla bean paste or extract
- 8.8 oz Rich Tea biscuits
- 7.1 oz good quality dark chocolate (around 70-72% cocoa solids)
- 5.3 oz salted butter, softened
- 5.3 oz caster sugar (we like Silver Spoon)
- 2 free-range eggs, medium
- 1 tsp vanilla bean paste or extract
Details
- Cuisine: British
- Recipe Type: Baking
- Difficulty: Easy
- Preparation Time: 30 mins
- Cooking Time: 0 mins
- Serves: 6
Step-by-step
- Prepare your tins – use 15cm (6in) or 20cm (8in) tins, at least 8cm (3in) deep. Using a springform is easier to release the set cake from, however they aren’t often quite deep enough and sometimes leave a bit of a ridge around the base. If you use a regular 8cm (3in) depth cake tin you can generously grease and place a cross of baking paper which goes right up the sides leaving a little excess to enable you to lift the cake out. Simply add this cross of 5cm (2in) wide strips in the base, then line the sides with a wide 8cm (3in) strip of parchment and then a circle on the base. To release the cake, plunge the tin into hot water for 10 seconds or so until the butter melts and will enable you to lift the set cake out of the tin/s.
- Begin by breaking the biscuits by hand into small pieces, try not to crush them. I avoid using a food processor or a rolling pin as you’re looking for good chunks of biscuit. It’s a good job to assign to kids.
- Melt the chocolate and butter in a microwave or bain marie, leave to cool slightly.
- With a balloon whisk or electric whisk, beat the eggs, sugar and vanilla for a minute or two until the mix is foamy and the sugar grains are beginning to dissolve, then pour in the melted chocolate, continuously beating until you have a glossy chocolate mixture.
- Fold through the broken biscuits and add about half the quantity needed into the tin/s, press down really firmly to pack the biscuits into the base with a rubber spatula or damp palms so you get a neat edge to the cake as this will become the top once turned out.
- Cover with the rest of the mix and using damp palms or a spatula push down really firmly to pack it all in, then use a palette knife to level and smooth over the top.
- Chill until completely set. At least 3 hours, ideally overnight.
- To make the chocolate coating (the recipe makes enough to cover a 15cm (6in) round. If making a 20cm (8in) cake, double the recipe. If making both, times by three). There may be a little excess left subject to how thickly you apply and how many holes are in the cake but it is better to have plenty. It will freeze for 3 months or keep in the fridge for up to 2 weeks.
- Boil the cream and pour over the chocolate, then pour on the butter. Leave to sit for 5 minutes with a plate covering the bowl to trap in the heat, then bring the ganache together by stirring with a wooden spoon in the centre of the mix in one direction until the ganache comes together.
- Set aside to cool and thicken slightly so it holds soft peaks and is spreadable.
- Pour onto the top of the cake and use a palette knife to spread over the top and sides as neat as possible. Leave to set in the fridge.
- If doing two tiers, you can stack the smaller tier onto the base tier then cover the entire cake or ice (frost) the 20cm (8in) one separately in the same manner as above, then stack together once they have both set. You will need to use a little ganache to fill the join. Both work, it depends what you find easiest. Decorate as you wish.
Credit: This recipe is by Juliet Sear and courtesy of Silver Spoon sugar.
You might also like:
Comments
Be the first to comment
Do you want to comment on this article? You need to be signed in for this feature