Chocolate yule log recipe

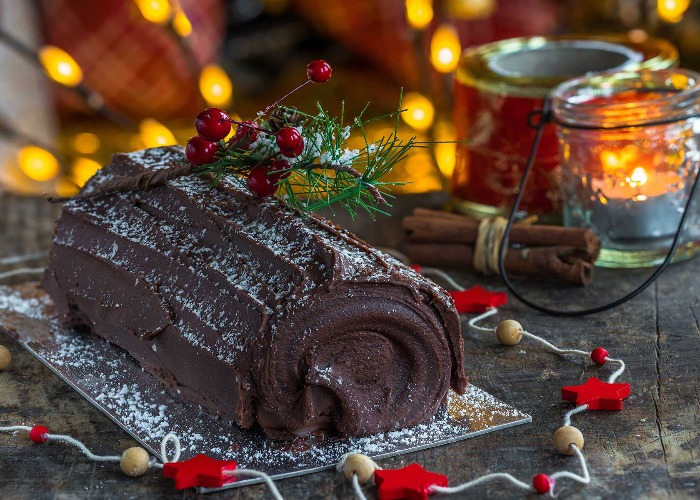
A rich festive log, filled and covered with a dark chocolate mousse. It’s pretty simple to make, but does require some chilling. It’s best made the day before serving.
Tips:
- You could also fill the log with whipped cream and crushed raspberries, or with a layer of apricot jam.
- As well as the mousse filling, you can spread a layer of sweetened chestnut purée over the sponge filling.
- Replace 1tbsp of the water with 1tbsp rum, brandy or Tia Maria for a more “grown-up” dessert.
- Make it extra festive by dusting the log with edible glitter and chocolate stars or curls.
Ingredients
- 200 g dark chocolate, at least 70% cocoa solids
- 3 large eggs, separated into yolks and whites
- 1 pinch sea salt
- 50 g caster sugar
- 7.1 oz dark chocolate, at least 70% cocoa solids
- 3 large eggs, separated into yolks and whites
- 1 pinch sea salt
- 1.8 oz caster sugar
- 7.1 oz dark chocolate, at least 70% cocoa solids
- 3 large eggs, separated into yolks and whites
- 1 pinch sea salt
- 1.8 oz caster sugar
- 6 large eggs, separated into yolks and whites
- 125 g caster sugar
- 50 g cocoa powder, plus extra for dusting
- 6 large eggs, separated into yolks and whites
- 4.4 oz caster sugar
- 1.8 oz cocoa powder, plus extra for dusting
- 6 large eggs, separated into yolks and whites
- 4.4 oz caster sugar
- 1.8 oz cocoa powder, plus extra for dusting
Details
- Cuisine: British
- Recipe Type: Cake
- Difficulty: Medium
- Preparation Time: 40 mins
- Cooking Time: 30 mins
- Serves: 8
Step-by-step
- First make the mousse filling and covering. Chop the chocolate into small pieces. Melt it very gently with 125ml (4.5fl oz) tepid water in a heatproof bowl suspended over a pan of gently simmering water. You don’t want the bowl to actually touch the water, or the chocolate will overheat.
- Once the chocolate has melted and is shiny and glossy, allow it to cool for around 5 minutes before stirring in the egg yolks. If it’s too hot, the chocolate will cook the yolks. Stir in the sea salt. You barely taste the salt, but it brings out the flavours of the chocolate.
- Whisk the egg whites until soft peaks form. Gradually add the sugar, a little at a time, and continue to whisk until the egg whites are stiff and glossy. Using a balloon whisk, fold a spoonful of egg white into the chocolate mixture then quickly fold in the rest. Put it into a large bowl. Transfer it to the fridge and leave to set for at least three hours.
- Line a 30x20cm (12x8in) Swiss roll tin with baking parchment. Heat the oven to 180°C/fan 160°C/350°F/gas mark 4.
- Whisk the egg yolks and caster sugar together until pale and thick, around 10 minutes. Sift over the cocoa powder and fold in.
- In a separate bowl, whisk the egg whites to stiff peaks, then fold in 1tbsp of the yolk mixture, then gradually add the remainder.
- Spoon it into the tin, levelling off the surface. Bake for 20–25 minutes, or until risen and springy to the touch.
- Prepare a sheet of baking parchment slightly larger than your tin by dusting it liberally with cocoa powder. Invert the cooked sponge onto the paper, then carefully peel off the baking parchment. Leave it to cool.
- Spread half the chocolate mousse over the sponge, leaving a border of 2cm (0.7in) around the edges. Carefully roll up the sponge tightly, beginning from the short end, using the base baking parchment to help you. Don’t worry if you have the odd crack – it will be covered with more mousse. With the join underneath, put it onto a serving plate – a couple of fish slices will help. Spread the remaining mousse all over the sponge. Make the log effect with a palette knife or fork. Leave in the fridge for a few hours or overnight. Dust with icing sugar just before serving.
Image: BBA Photography/Shutterstock
You might also like:
Comments
Be the first to comment
Do you want to comment on this article? You need to be signed in for this feature